|
Creating Variables
Overview
See Variables Overview for a detailed discussion of variables.
In many cases you will want to import a variable from a datafile. It is likely that most clinical variables will be imported this way. However, sometimes it is useful to be able to create a variable directly within GeneLinker. For example, there may be one or two samples that you realize have been mislabeled or that cannot be used in a particular analysis. To eliminate samples from a dataset you can define a variable, assign values to it and then use GeneLinker's sample removal capability to delete those samples from further analysis.
Another use for variable creation is resampling studies. GeneLinker's variable creation function makes the creation of randomized copies of an existing variable simple, making it possible to re-run analyses with the randomized variables to estimate the significance of results. Coupled with GeneLinker's meta-scripting capabilities this makes resampling analysis straightforward.
Actions
1. Click a dataset in the Experiments navigator. The item is highlighted.
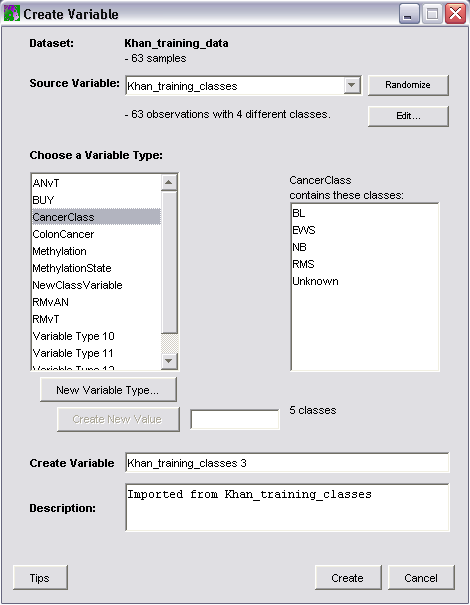
2. Select Create Variable from the Statistics menu. The Create Variables dialog is displayed.

The dataset that the variable information applies to is displayed as the Dataset. Variable information applies to all datasets in a branch of the Experiments navigator tree.
The number of samples in the dataset is shown under the dataset name.
All existing variable types are displayed in the Choose a Variable Type box.
All existing classes in the selected variable type are listed in the box on the right.
3. The Source Variable
for the variable data is listed just below the Dataset.
To change the source variable, select from the options in the drop-down list. If no variables exist for the dataset the list will contain only
GeneLinkerô supplies a variable name and description. They are displayed at the bottom of the dialog.
If there are existing variable types, GeneLinkerô compares the classes in the source variable to the classes of the existing types and selects a type based on this.
If no variable type exists, the Create Variable Type dialog is displayed. See the section Create Variable Type below for instructions on how to do this.
To add a new value to a variable type, enter it into the adjacent text area and press the Create New Value button. New values are commited to the database only when the Create button is pressed on the dialog, so if you want to erase what you've done simply hit the Cancel button and start over.
To randomize the new variable, so it is just a shuffled copy of the source variable, press the Randomize button. The number of classes of each type will be unchanged; the variable values will just be randomly re-ordered.
Preview
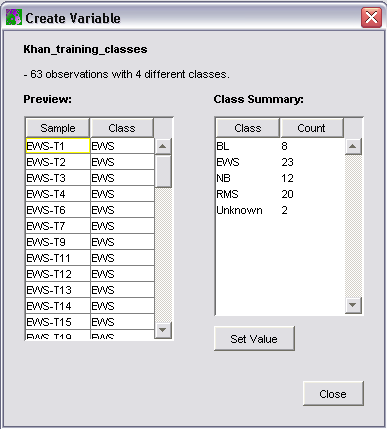
To edit the contents of the new variable file, click the Edit button. The Create Variable preview dialog is displayed.

The name of the variable file is displayed at the top.
The class entries in the new variable are displayed under the Preview heading beside the sample names they are assigned to. The scrollbar can be used to look through the entire list.
The Class Summary on the right lists the names of all the classes and gives a count for each.
To change a value select a sample from the preview table by clicking on it, select the desired value from the class summary table, and press the Set Value button. To set multiple values at the same time the usual Shift-Click and Control-Click capabilities can be used to select multiple values from the table.
To erase changes and start over, simply return to the main dialog by hitting the Close button and re-select the source variable, changing to a different variable first. Remember, none of your actions are permanent until you hit the Create button. However, once a variable is created it can only be deleted, not edited. This is required to maintain the integrity of past experiments using that variable.
Click Close to return to the Import Variables dialog.
Create Variable Type
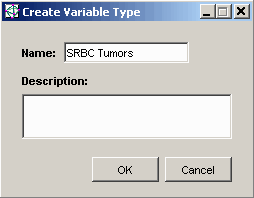
To create a new variable type, click New Variable Type (or if there are no existing types, this dialog will be displayed automatically).

Enter a name for the variable in the Variable Name text box.
Optionally, enter a description for the variable in the Variable Description text box.
Click OK to return to the Create Variables dialog.
The 'unknown' class is automatically added to all new variable types. It will be listed on the Create Variables dialog.
6. Click Create.
The variable data is imported into the database, and in the Experiments
navigator, the dataset icon is marked with the variable tag (![]() for a complete dataset or
for a complete dataset or ![]() for an incomplete
dataset).
for an incomplete
dataset).
Related Topics:

