|
Division by Central Tendency (Median)
Overview
This procedure scales the values across samples (gene chips) so that the median of each sample is equivalent. This is done for all samples.
This scaling is useful if you have reason to believe that the most genes will be relatively unchanged, but there may be non-biological sample-dependent factors influencing the raw measurements. Similarly, if you expect a large number of genes to be perturbed but both up- and down-regulation are equally likely, then this would be a reasonable operation.
The greater the fraction of responding genes in your dataset, the less reliable is this scaling. For instance, if your data has been pre-filtered to retain only genes known to be affected by the experimental conditions, then this normalization may introduce undesirable distortions into your data. We therefore recommend that you apply this normalization before any variation filtering.
This normalization is usually only meaningful if applied to count data. We do not recommend applying this normalization to ratio data or data which has already been subject to a logarithm transformation, both of which may yield zero or negative values. Applying median scaling to samples with negative medians may yield drastically distorted data. Applying median scaling to samples with zero or near-zero medians will cause GeneLinkerô to fail to complete the operation, and generate an error message.
Median scaling is similar in principle to mean scaling, but the median is less susceptible to outliers and therefore preferred.
Before clustering, it is recommended that standardization be performed after median scaling. Median scaling makes the scales of the chips approximately equivalent, but genes may still differ in scale and standardization can address this.
Actions
1. Click a complete dataset in the Experiments navigator. The item is highlighted.
2. Click the Normalize
toolbar icon ![]() , or select Normalize
from the Data menu, or right-click
the item and select Normalize
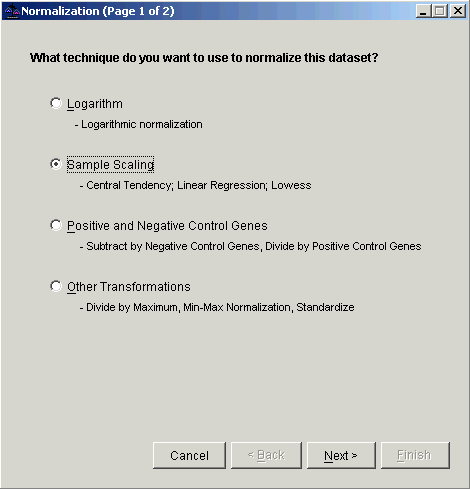
from the shortcut menu. The first Normalization
dialog is displayed.
, or select Normalize
from the Data menu, or right-click
the item and select Normalize
from the shortcut menu. The first Normalization
dialog is displayed.

3. Double-click the Sample Scaling radio button, or click it and click Next . The second Normalization dialog is displayed.

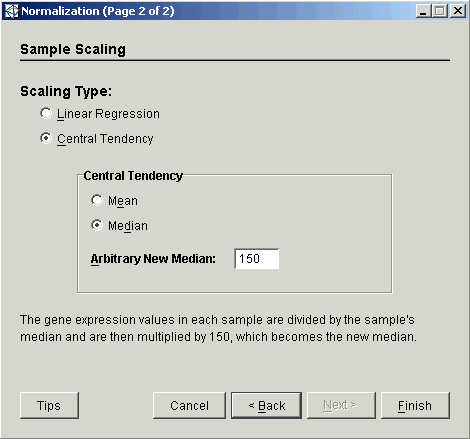
4. Select Central Tendency as the Scaling Type.
5. Set the Central Tendency to Median.
6. Set the Arbitrary New Median to the value to which the sample medians should be scaled. The total intensity of each sample after scaling will be this number times the number of genes in the dataset.
7. Click Finish. The Experiment Progress dialog is displayed. It is dynamically updated as the Median Scaling Normalization operation is performed. To cancel the Median Scaling Normalization operation, click the Cancel button.

If the operation cannot complete an error message is displayed. The operation will fail, for example, if the median of any sample is zero or near zero.
Upon successful completion, a new normalization dataset is added under the original dataset in the Experiments navigator.
Related Topics:

