|
Importing Multiple Files With One Sample Each
Overview
It is assumed that you have already selected a multiple data files each containing a single sample type template (Affymetrix, CodeLink, DCHIP paired xls files, GenePix, Genomic Solutions, Quantarray, ScanArray) for data import (see Selecting a Template for Data Import or the appropriate Formats and Templates page). Follow the steps in this procedure to transfer your data from the files into the GeneLinkerô database.
If you selected a template that includes replicate merging, you may wish to read Merging Within-Chip Replicate Measurements for detailed information on this process.
For DCHIP paired xls files, there can be more than one sample per data file. In this case, samples are ordered according to their order in the first file. Samples that are present in one file but not the other will have missing values for the file they are missing from.
Actions
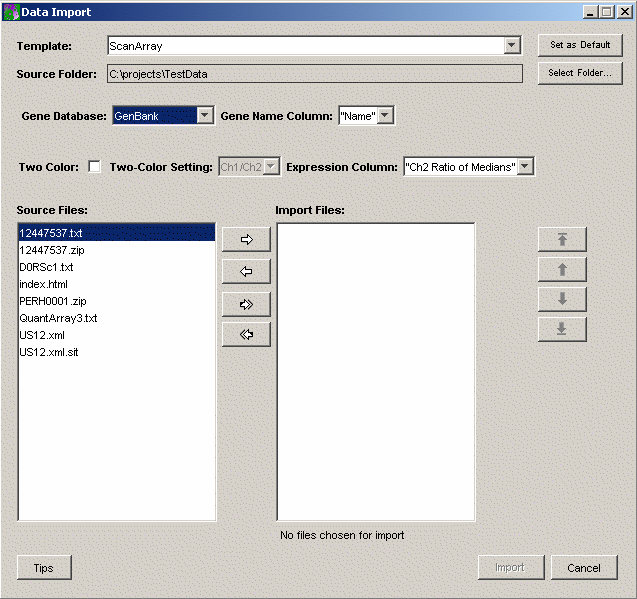
For these templates, the Data Import dialog looks like this:

The precise look of the dialog will vary with the template. In particular, for templates that do not support two-color data the dialog will not include the Two-Color Checkbox and associated Two-Color Setting drop-down list. Most templates supply a choice of which column from the data file to import into GeneLinker as the Gene Name. Many also support a choice of which column to use as the Expression Value. If the choices you need are not included, please contact Predictive Patterns and we can easily add them for you.
For templates that support two-color data, the Two-Color Checkbox is used to indicate that the data should be import the data as two-color rather than as single channel data. The Two-Color Setting determines whether Ch1/Ch2 is used for ratio data or Ch2/Ch1. In most cases, backgrounds are subtracted off before ratios are taken. When two-color data is imported there are actually four values that are used: the background-subtracted ratio, which is the value GeneLinker displays and which is used as the input to most algorithms; the individual channel values; and the product of the channel values. This combination of values is used to make Lowess normalization possible.
If you selected the incorrect template, Click the Templatedrop-down list to select the correct template.
If the Gene Database is not correct, use the Gene Database drop-down list to set it to match the gene identifier type the genes in the data being imported have .
Select the Data Folder
All the data files for a given experiment must reside in a single folder.
If the Source Folder listed on the Data Import dialog contains your data files and the data files are listed in the left list box, skip down to Choose Files for Import (below).
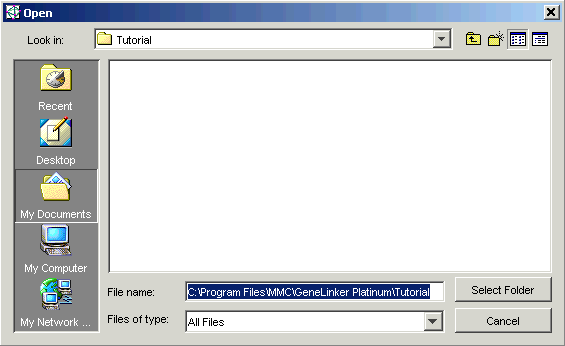
If the Source Folder is incorrect, click the Source Folder ... button. The Open dialog is displayed

1. Navigate until the folder containing your data files is visible.
2. Click the folder name. The folder name is highlighted.
3. Click Select Folder. The Data Import dialog is updated with the selected folder name and the files in that folder are listed in the Source Files list box of the Data Import dialog.

Choose Files for Import
To select a single file, click the file name.
To select multiple files, press and hold the <Ctrl> key and click each file name.
To select a series of files, press and hold the <Shift> key and click the first and last file names in the series.
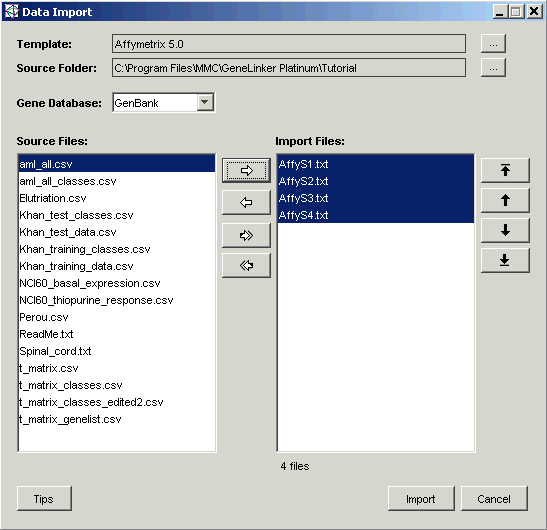
1. Use the buttons between the list boxes to create an Import Files list in the right list box. The buttons between the left and right list boxes have the following functions:
The top button
 transfers the selected file(s) from the left to the right
list box.
transfers the selected file(s) from the left to the right
list box.The second button
 transfers the selected file(s) from the right to the left
list box.
transfers the selected file(s) from the right to the left
list box.The third button
 transfers all files
(selected or not) from the left to the right list box.
transfers all files
(selected or not) from the left to the right list box.The bottom button
 transfers all files
(selected or not) from the right to the left list box.
2. Order the import file list to be the sample order for the dataset that will be created. Files are imported from the top of the list to the bottom. Use the buttons to order the files for import. The buttons to the right of the right list box have the following functions:
The top button
 moves the selected file to the top
of the list.
moves the selected file to the top
of the list.The second button
 moves the selected file up one position in the list.
The third button
 moves the
selected file down one position in the list.
moves the
selected file down one position in the list.The bottom button
 moves the selected file to the bottom
of the list.

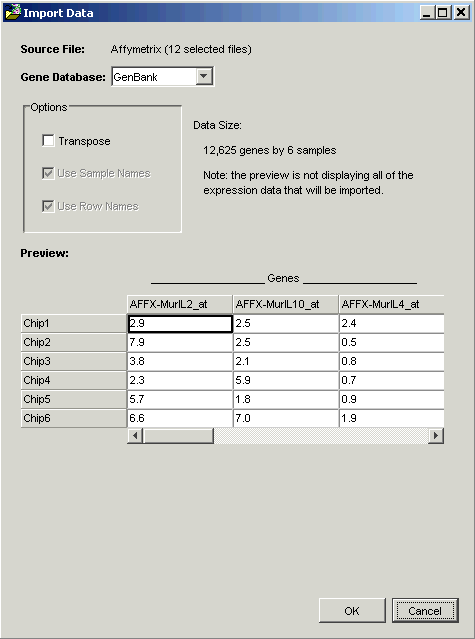
3. Click Import. The Import Data dialog is displayed.

GeneLinkerô assumes that the number of genes is greater than the number of samples and orients the data so that the larger dimension (genes) is in columns. If this assumption is incorrect and the number of genes in your dataset is less than the number of samples, click the Transpose checkbox to pivot the data so that the larger dimension (samples) is in rows.
If the first column and/or row contain text, GeneLinkerô uses the text as column and/or row header names. If you have column and/or row names that are numeric, click the column and/or row name checkbox to indicate this to GeneLinkerô.
4. When the data displayed in the Preview looks correct, click OK. Once the dataset has been successfully imported into the GeneLinkerô database, a new dataset item is added to the Experiments navigator.
Notes
If the name of the dataset being imported already exists in the Experiments navigator, the new dataset is given a new, unique name (a numerical identifier is appended to the original name) to make it distinct from the existing dataset.
If your data file is not in the correct format, the import process will fail. For complete file format details see:
Importing Data from Affymetrix MAS 4.0 Files
Importing Data from Affymetrix MAS 5.0 Files
Importing Data from CodeLink XML Files
Importing Data from dChip xls Files
Importing Data from GenePix Files
Importing Data from Genomic Solutions Files
Importing Data from Quantarray Files
Importing Data from Scanarray Files
Related Topics:
Selecting a Template for Data Import
Selecting the Gene Database Type
Merging Within-Chip Replicate Measurements

